How to Setup qBittorrent with ProtonVPN & Port Forwarding on Debian 13 (Headless)
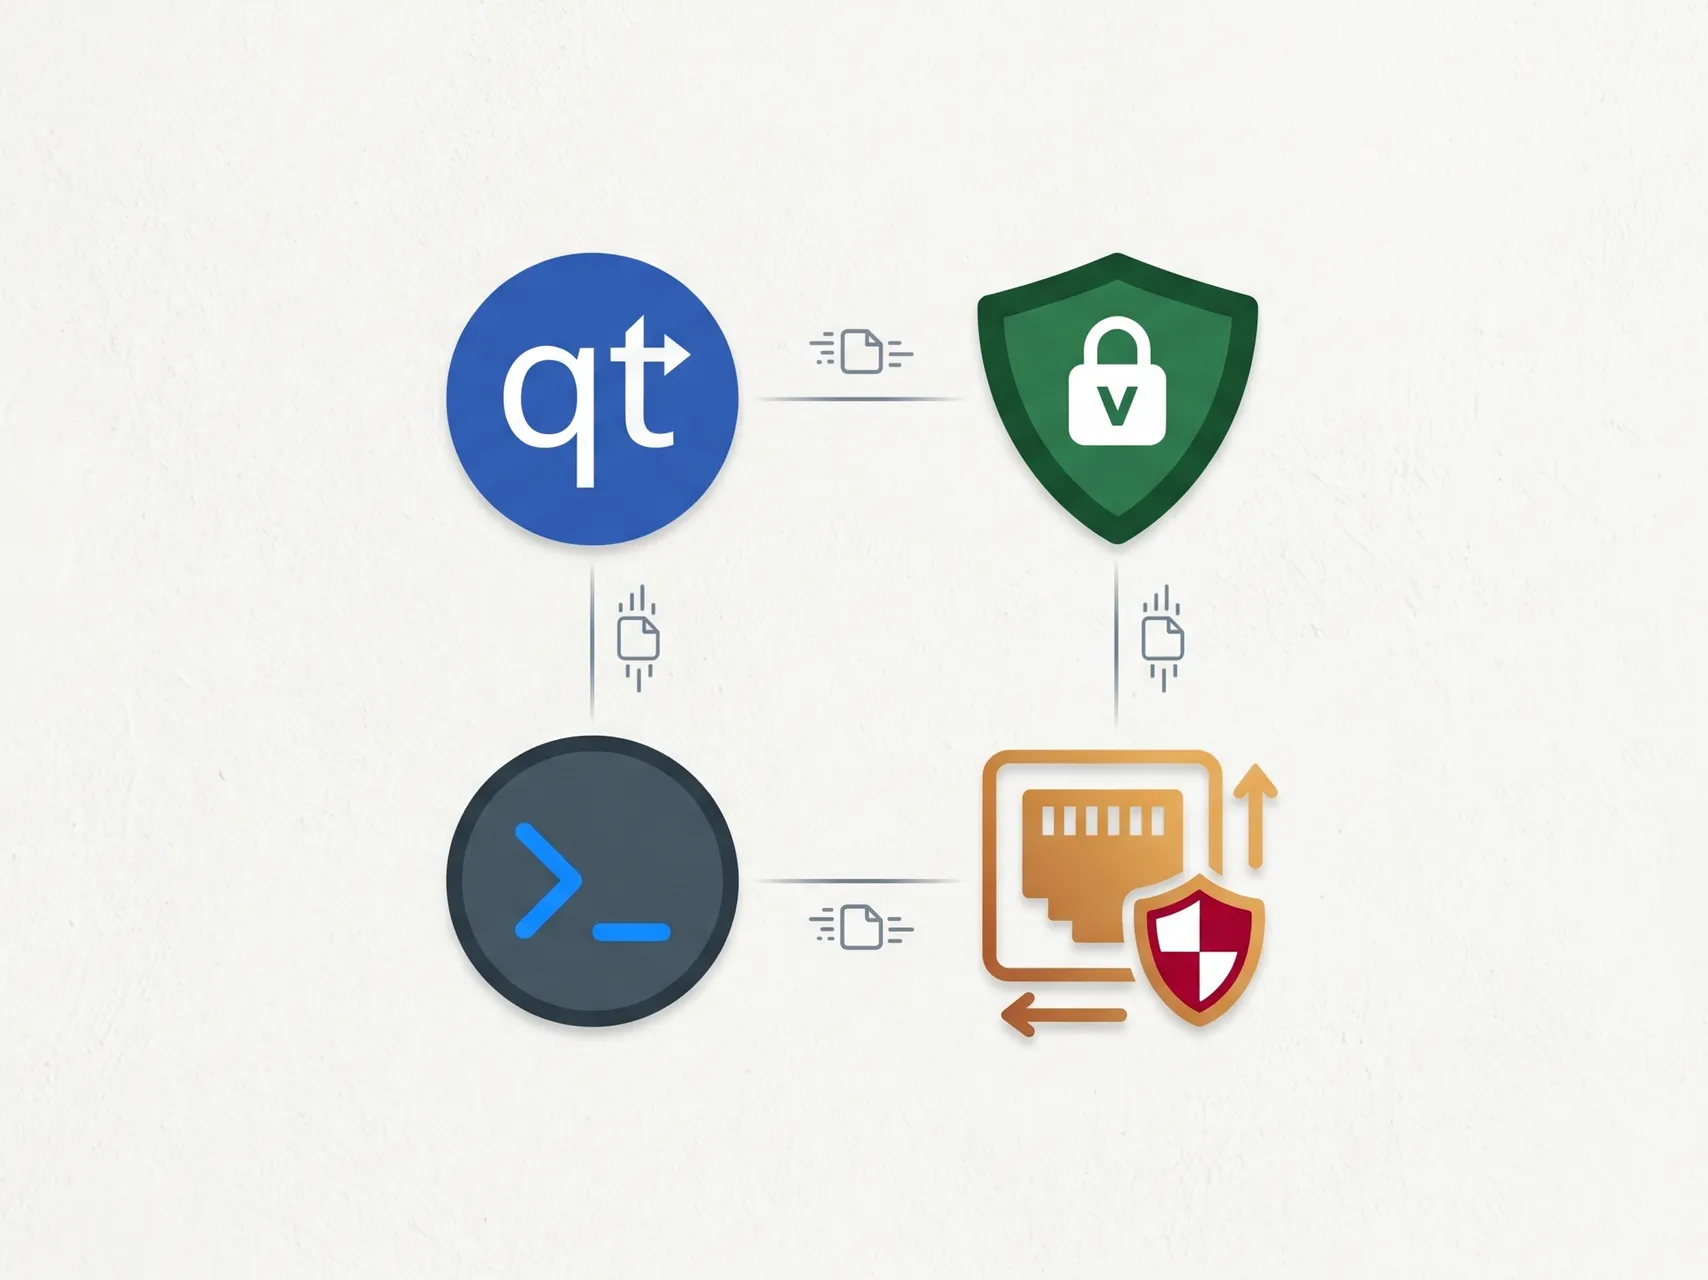
Running a torrent client safely requires a solid VPN with port forwarding. In this guide, we will walk through setting up qBittorrent-nox (the headless version) alongside ProtonVPN CLI on a headless Debian 13 server or Proxmox LXC container .
We will also cover how to automate ProtonVPN’s dynamic port forwarding using a custom systemd service so your connection never drops and qBittorrent is always synced.
Note: You need a paid ProtonVPN plan to use P2P traffic; the free plan does not support it.
Tip: You can sometimes find cheap introductory offers (like 99 INR for the first month) via the ProtonVPN Android app .
Installing qBittorrent-nox
New LXC / minimal install? You may need to install
sudofirst:apt install sudo
(If you are running asrootinside an LXC, you can skipsudoand run commands directly.)
First, we need to install the headless version of qBittorrent along with curl (needed later for the port-forwarding script). Run the following commands:
sudo apt update
sudo apt install qbittorrent-nox curl
We also need a proper UTF-8 locale, otherwise qBittorrent prints a warning in the logs. On Debian 13, the locales package is already installed by default, but we need to generate en_US.UTF-8 (it’s usually not generated by default):
sudo locale-gen en_US.UTF-8
What does this do?
locale-gengenerates locale data so the system knows abouten_US.UTF-8. Without this, qBittorrent falls back toC.UTF-8(which works but prints a warning every time).Want to make UTF-8 the system default? Run this too:
sudo update-locale LANG=en_US.UTF-8(Optional — qBittorrent works fine either way; this just cleans up system-wide locale warnings.)
First Run (Get Your Temporary Password)
qBittorrent generates a random admin password on its very first launch. You need to see this password before sending it to the background. Run it in foreground mode first with the --confirm-legal-notice flag to accept the legal notice:
qbittorrent-nox --confirm-legal-notice
You will see output like this:
******** Information ********
To control qBittorrent, access the WebUI at: http://localhost:8080
The WebUI administrator username is: admin
The WebUI administrator password was not set. A temporary password is provided for this session: rrkwEZLd8
You should set your own password in program preferences.
What’s happening? The
--confirm-legal-noticeflag tells qBittorrent you’ve read and accepted its terms. Without it, qBittorrent prints a legal notice every time. This flag also creates a[LegalNotice] Accepted=trueentry in the config file so future runs don’t ask again.
Write down the temporary password (in this example: rrkwEZLd8), then press Ctrl+C to stop qBittorrent. We’ll restart it properly in the next step.
Run qBittorrent in the Background (Daemon Mode)
Now that the config file exists and the legal notice is accepted, start qBittorrent as a background daemon. You no longer need --confirm-legal-notice — it’s already saved in the config:
qbittorrent-nox --daemon
What does
--daemondo? The-d/--daemonflag tells qBittorrent to fork into the background — it detaches from your terminal and keeps running even after you log out. No need forsystemdornohup! Every subsequent start from now on is justqbittorrent-nox --daemon.
Verify it’s running:
pgrep -a qbittorrent
You should see something like:
13596 qbittorrent-nox --daemon
Once running, you can access the WebUI from your browser at: http://<your-server-ip>:8080
Change the Admin Password
The temporary password changes every time qBittorrent restarts, so we need to set a permanent one. Since the daemon is running, we can use the WebUI API with curl:
# Log in with your temp password (replace 'rrkwEZLd8' with yours)
curl -c /tmp/qbit_cookie.txt -X POST -d "username=admin&password=rrkwEZLd8" http://localhost:8080/api/v2/auth/login

# Set a new password (change 'my_secure_password' to something strong!)
curl -b /tmp/qbit_cookie.txt -X POST -d "json=%7B%22web_ui_password%22%3A%22my_secure_password%22%7D" http://localhost:8080/api/v2/app/setPreferences
How this works: The first request logs in and stores a session cookie in
/tmp/qbit_cookie.txt. The second request uses that cookie to send the new password to qBittorrent’s settings API. The%7B%22...%22%7Dis URL-encoded JSON — it decodes to{"web_ui_password":"my_secure_password"}.
Important: Update the
QBIT_PASSvariable in the port-forwarding script later with this new password.
Optional: Auto-Start on Boot
If you want qBittorrent to start automatically when the server reboots, add the daemon command to /etc/rc.local:
sudo tee -a /etc/rc.local << 'EOF'
#!/bin/sh
qbittorrent-nox --daemon
exit 0
EOF
sudo chmod +x /etc/rc.local
What is rc.local? It’s a script that runs at the end of the boot process. Adding the daemon command here makes qBittorrent start automatically on every reboot. Make sure the file is executable (the
chmod +xstep).
Installing ProtonVPN CLI
Next, we need to install the official ProtonVPN command-line tool.
Before that, we need to make sure the LXC can create a VPN network. By default, LXC containers are not allowed to use the /dev/net/tun device. Get your LXC ID from the Proxmox host and edit its config:
nano /etc/pve/lxc/<lxc-id>.conf
Replace
<lxc-id>with your actual LXC container ID.
Add this line at the end:
dev0: /dev/net/tun
Then restart the LXC from the Proxmox host:
pct reboot <lxc-id>
One way to install:
Warning: Installing
proton-vpn-clipulls in ~200+ packages (including NetworkManager, GTK libraries, GNOME keyring, etc.). On a minimal LXC this can take several minutes. This is normal — the ProtonVPN CLI has a lot of dependencies.
-
Download the repository configuration package:
wget https://repo.protonvpn.com/debian/dists/stable/main/binary-all/protonvpn-stable-release_1.0.8_all.deb -
Install the repository and update packages:
sudo dpkg -i ./protonvpn-stable-release_1.0.8_all.deb
sudo apt update
You might get this dpkg error about missing
gnupg:dpkg: dependency problems prevent configuration of protonvpn-stable-release: protonvpn-stable-release depends on gnupg | gnupg2; however: Package gnupg is not installed.To fix it, run:
sudo apt install -fThe
-f(or--fix-broken) flag tellsaptto download the missing dependencies (gnupg,dirmngr, etc.) and complete the installation.The
.debcreates a source file at/etc/apt/sources.list.d/protonvpn-stable.sources. If it’s missing afterapt install -f, just re-runsudo dpkg -i ./protonvpn-stable-release_1.0.8_all.debto regenerate it. -
Update apt again (should now show
repo.protonvpn.comin output):sudo apt update -
Install the CLI tool:
sudo apt install proton-vpn-cli⏱ This will take a while — NetworkManager, GNOME keyring, GTK libraries, and many other dependencies are being pulled in.
Another way to install (manual repo setup):
⚠️ Pick ONE method. If you already used the
.debmethod above, you already have the repo configured — skip this section. Running both methods creates duplicate apt source entries (one.sourcesfile + one.listfile) and wastes time onapt update.
If the .deb method above doesn’t work for you, you can add the ProtonVPN repo manually:
- Install the fetching utilities — make sure your container has the tools needed to download keys securely:
sudo apt install -y curl gnupg ca-certificates - Download the security key — manually download Proton’s GPG key and store it in your system’s keyring so
apttrusts the packages:curl -fsSL https://repo.protonvpn.com/debian/public_key.asc | sudo gpg --dearmor -o /usr/share/keyrings/protonvpn-archive-keyring.gpgNote: If it asks to overwrite an existing file, press
yand hit Enter. - Add the repository manually — create the repository file:
echo "deb [signed-by=/usr/share/keyrings/protonvpn-archive-keyring.gpg] https://repo.protonvpn.com/debian stable main" | sudo tee /etc/apt/sources.list.d/protonvpn.list - Update apt — you should see
repo.protonvpn.comin the output:sudo apt update - Install the CLI:
sudo apt install proton-vpn-cli
Crucial Step for Headless / Proxmox LXC Users
ProtonVPN CLI relies on D-Bus, which is designed for graphical desktop environments. In headless servers or Proxmox LXC containers, it will fail with:
dbus_fast.errors.InvalidAddressError: DBUS_SESSION_BUS_ADDRESS not set
To fix this, we need three things:
-
Install
dbus-x11(providesdbus-launch— not installed by default on minimal Debian):sudo apt install dbus-x11 -
Enable lingering — ensures background services continue running after logout:
loginctl enable-linger $USER -
Start a D-Bus session — this must be done in every new SSH session before running any
protonvpncommands:export $(dbus-launch)
Tip: To avoid typing
export $(dbus-launch)every time you SSH in, add it to your~/.bashrc. Theifguard below prevents spawning a new D-Bus daemon on every shell (which would leave orphan processes):echo 'if [ -z "$DBUS_SESSION_BUS_ADDRESS" ]; then export $(dbus-launch); fi' >> ~/.bashrc
Sign in to ProtonVPN
Before you can connect or change settings, you need to log in with your ProtonVPN credentials:
Before running this: Make sure you have a D-Bus session running (see “Crucial Step” above). If you get a D-Bus error, run
export $(dbus-launch)first and try again.
protonvpn signin <your_username>
You will be prompted for your password. It will not show up on the screen as you type.
Need a Plan? You need a paid ProtonVPN plan (not the free tier) for P2P and port forwarding.
Configuring ProtonVPN
Before connecting, we need to optimize our VPN configuration for P2P traffic. Note: These commands require you to be signed in first (see previous step).
-
Enable Port Forwarding (Essential for P2P — without this, the later
natpmpcsetup won’t work):protonvpn config set port-forwarding on -
Enable Kill Switch — stops all traffic if the VPN drops:
protonvpn config set kill-switch standard -
Enable IPv6 (Optional but recommended for full compatibility):
protonvpn config set ipv6 on -
Verify your settings:
protonvpn config list⚠️ Troubleshooting: If this command hangs (no output for 10+ seconds), you are likely not properly signed in or D-Bus is not running. Press Ctrl+C, run
export $(dbus-launch), verify you’re signed in withprotonvpn status, then try again.For more details on the CLI, check the ProtonVPN Linux CLI documentation
Connect to a Server
Now connect to a P2P-friendly server:
protonvpn connect
Or specify a country (e.g., India):
protonvpn connect --country IN
Check the connection status:
protonvpn status
You should see Status: Connected. A new network interface proton0 should appear (check with ip a).
Automating Port Forwarding with natpmpc
Here lies the main issue: Even though we enabled port forwarding in the ProtonVPN CLI, it doesn’t automatically map the port to our local application on Debian. Furthermore, ProtonVPN assigns a random port every time you reconnect.
To fix this, we need a tool called natpmpc.
sudo apt install natpmpc
Note: Ensure your natpmpc version is 20230423-xxx or newer to avoid a known VPN mapping bug. Check with
apt policy natpmpc. On Debian 13 (trixie), the available version is20230423-1.2+b3which works fine.
To manually request a port and keep it alive:
natpmpc -a 1 0 udp 60 -g 10.2.0.1 && natpmpc -a 1 0 tcp 60 -g 10.2.0.1
Finding the correct gateway IP: The script uses
10.2.0.1— this is ProtonVPN’s default internal gateway. If it doesn’t work for you, find your actual gateway by runningip routeafter connecting to the VPN and looking for theproton0interface’s default route.
The Systemd Automation Fix
We don’t want to run this manually, nor do we want to copy-paste the new port into qBittorrent every time the VPN reconnects. We will create a background service to handle this entirely.
-
Create the Automation Script
sudo nano /root/proton-port.shPaste the following code. Make sure to change your qBittorrent password in the
QBIT_PASSvariable!#!/bin/bash # --- CONFIGURATION --- QBIT_USER="admin" QBIT_PASS="your_password" # CHANGE THIS to your WebUI password QBIT_URL="http://localhost:8080" GATEWAY="10.2.0.1" COOKIE_JAR="/tmp/qbit_cookie.txt" # --------------------- while true; do date # 1. Run natpmpc and grab the assigned port number PORT=$(natpmpc -a 1 0 udp 60 -g $GATEWAY | grep "Mapped public port" | awk '{print $4}') if [ -z "$PORT" ]; then echo "ERROR: Could not get a port from natpmpc" sleep 10 continue fi # Run the TCP mapping as well (Proton requires both) natpmpc -a 1 0 tcp 60 -g $GATEWAY > /dev/null echo "ProtonVPN assigned Port: $PORT" # 2. Try to log into qBittorrent Web UI API # NOTE: We check the response body, not just curl's exit code. # curl returns exit 0 even on HTTP 403 (wrong password), so we # must check that the actual response is "Ok." LOGIN_RESULT=$(curl -s --connect-timeout 3 -X POST -d "username=${QBIT_USER}&password=${QBIT_PASS}" ${QBIT_URL}/api/v2/auth/login --cookie-jar $COOKIE_JAR) if [ "$LOGIN_RESULT" = "Ok." ]; then # 3. Send the new port to qBittorrent preferences curl -s -X POST -d "json=%7B%22listen_port%22%3A%22$PORT%22%7D" ${QBIT_URL}/api/v2/app/setPreferences --cookie $COOKIE_JAR > /dev/null echo "Successfully updated qBittorrent to use port $PORT" rm -f $COOKIE_JAR else echo "Notice: qBittorrent login failed (wrong password or WebUI unreachable). Check QBIT_PASS in the script." fi # Wait 45 seconds before renewing the VPN lease (Proton requires renewal every 60s) sleep 45 doneNote: The script needs
curl(we already installed it in the qBittorrent step above).Save and close (CTRL+O, Enter, CTRL+X), then make it executable:
sudo chmod +x /root/proton-port.sh -
Create the Systemd Service Now, let’s make it run securely in the background:
sudo nano /etc/systemd/system/proton-port.servicePaste the following:
[Unit]
Description=ProtonVPN NAT-PMP Port Forwarding Fixer
After=network.target

[Service]
Type=simple
ExecStart=/root/proton-port.sh
Restart=always
RestartSec=5

[Install]
WantedBy=multi-user.target
Save and close.
-
Enable and Start the Service
sudo systemctl daemon-reload
sudo systemctl enable proton-port.service
sudo systemctl start proton-port.service
You can view the live logs of this script to ensure it’s successfully talking to qBittorrent:
sudo journalctl -u proton-port.service -f
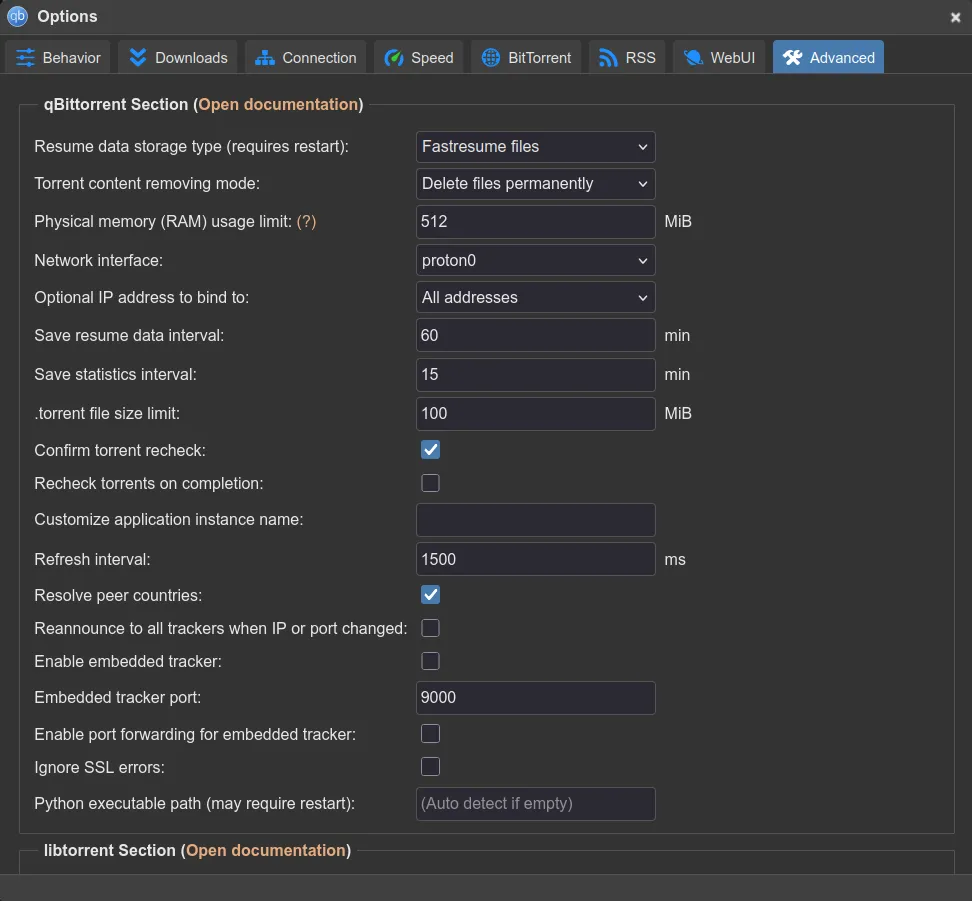
Bind qBittorrent to the VPN Interface
The final and most important step to prevent IP leaks is to force qBittorrent to only use the VPN.
Accessing the WebUI remotely: The LXC/server is on your local network. If you can’t reach
http://<server-ip>:8080directly from your browser, use SSH port forwarding:ssh -L 8080:localhost:8080 root@<your-server-ip>Then open
http://localhost:8080in your local browser.
-
Open the qBittorrent WebUI
http://<server-ip>:8080. -
Navigate to
Tools > Options > Advanced. -
Scroll down to Network interface and select
proton0from the drop-down. (This ensures that if the VPN drops, all downloads stop immediately).Under
Optional IP address to bind to, selectAll addressesto allow both IPv4 and IPv6 (if you enabled IPv6 in ProtonVPN).
Final Checklist
-
ProtonVPN is running and connected (protonvpn status).
-
Port forwarding script is running successfully in the background.
-
qBittorrent is securely bound to proton0.
-
Torrents are downloading utilizing the active P2P port.
Troubleshooting & Debugging
If things aren’t working as expected, check these common issues:
-
“Failed to connect to D-Bus” Errors
If the protonvpn command throws DBus errors, you lost your session variables. Run this again before typing protonvpn commands:
export $(dbus-launch) -
natpmpc returns an error or timeout
- Verify your VPN is actually connected:
protonvpn status - Ensure you are connected to a server that supports P2P (some free/basic servers do not).
- Ensure port forwarding is actually toggled on:
protonvpn config list(look forport_forwarding: on)
- Verify your VPN is actually connected:
-
qBittorrent isn’t updating to the new port
Check the logs of your background service:
sudo journalctl -u proton-port.service -n 50If it says
Notice: qBittorrent login failed, check the following:- Did you update the
QBIT_PASSvariable in/root/proton-port.shto match your actual WebUI password? - Did you change the default WebUI port? If so, update the
QBIT_URLvariable in the script. - Is qBittorrent running? Check with
pgrep -a qbittorrent.
- Did you update the
-
I lost my qBittorrent Admin password!
Quick reset (one-liner): Stop qBittorrent, delete the password hash from config, then restart:
pkill qbittorrent-nox
sleep 2
sed -i '/^WebUI\\Password_PBKDF2=/d' ~/.config/qBittorrent/qBittorrent.conf
qbittorrent-nox --daemon
sleep 3
timeout 5 qbittorrent-nox 2>&1 | grep "temporary password"
What this does:
pkillkills the daemon,sedremoves the password line from the config file (which forces qBittorrent to generate a new one on next start),--daemonrestarts it in the background. Thetimeoutline runs it briefly in the foreground to capture the new temp password. After the first run, the legal notice is already saved in the config, so you never need--confirm-legal-noticeagain.Via manual edit: Open the config file:
nano ~/.config/qBittorrent/qBittorrent.confFind the line starting with
WebUI\Password_PBKDF2=...and delete that entire line. Save and exit, then restart qBittorrent:pkill qbittorrent-nox qbittorrent-nox --daemonTo see the new temporary password, run it in foreground briefly:
timeout 5 qbittorrent-nox 2>&1 | grep "temporary password"